holiday diy: christmas ornaments with switch plate covers
Happy December, fellow ReStore shoppers. It’s Sarah of www.sadieseasongoods.com again, with a new upcycling project idea to share with you!
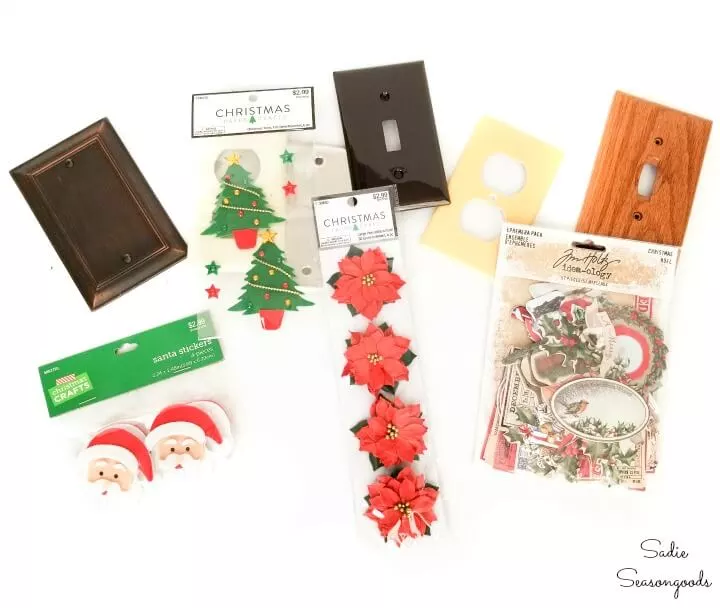
Seeing as it’s December, I thought it would be fun to create a Christmas project for you that was easy, fun to do with the kids, and used something you can find at every Charlotte Region ReStore: Switch Plate Covers! There are TONS of them available and they are super cheap, which makes them an ideal craft supply. So, let’s make some ornaments for the tree with them!
Here’s what you’ll need:
- Light switch covers/outlet covers (plastic, wood, or metal- your choice!)
- Paint (Spray or brush-on with a paint brush)
- Decorations (Stickers, gift wrap, old Christmas cards, etc.)
- Craft glue and/or decoupage glue and brush
- Twine, ribbon, string, or heavy-duty thread (whatever you have on hand)
- Craft scissors
- Drill and small bits (Optional)
- Felt (Optional)
Safety first!
Make sure you have a safe, well-ventilated space to use your spray paint. If you use a drill to make additional holes in plastic or wood switch plate covers, please wear appropriate safety gear (goggles, work gloves, etc.) and use caution while drilling.

- Collect some switch plate covers from your local Charlotte Region ReStore.
- I collected a variety of types including light switch, outlet, and blank wall plates.
Then, wipe them down and remove any packaging or price tags. - If you need a different hole at the top of your plastic or wood plates, please drill a small hole now. This will be used for the twine/ribbon that you use to hang your ornaments.

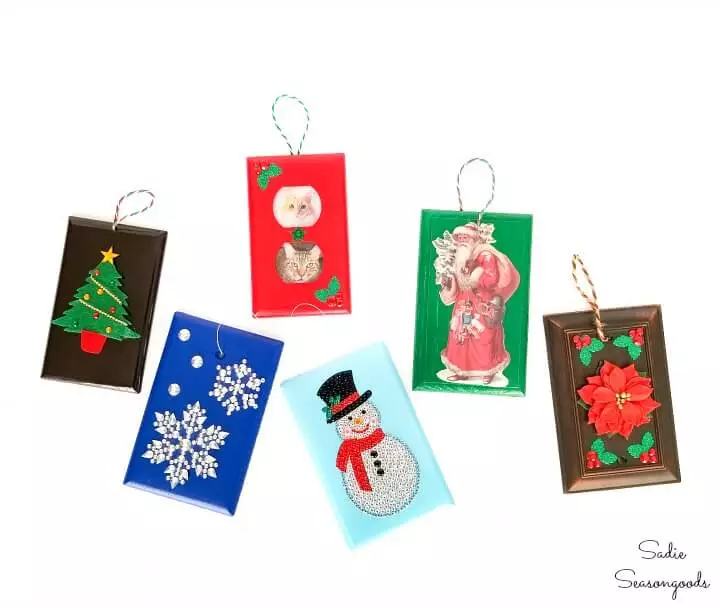
- Paint your switch plate covers and allow to dry thoroughly.
- Once the paint is dry, it’s time for the best part- DECORATING! I found all kinds of gorgeous Christmas stickers at area craft stores. But you can use any number of things to decorate your switch plate covers. Wrap them like gifts and decorate with ribbon and bows. Or cut up old Christmas cards and decoupage the graphics on the switch plate covers. The sky is the limit here!
- I even printed some photos of our kitty cats and upcycled an outlet cover into a photo frame! I used a plastic binder divider (from an office supply store) that I glued to the inside of the outlet cover. Then, I taped their photos behind the openings and placed another piece of plastic binder divider behind the photos.
- Tie a loop of string or twine through an existing hole or a drilled hole at the top of your ornament.
- Optional step- cut out a rectangle of felt and glue to the back of the switch plate cover for a cleaner, more finished look.
- Hang on your tree and enjoy!
Merry Christmas and Happy Holidays!
These DIY ornaments are a great activity for the kids or grands, too. And, the blank wall plates would be fabulous as reusable gift tags, as well. Simply paint them with chalkboard paint, write the to/from with chalk or a chalk pen, and tie to a gift!
Are you feeling these DIY Christmas ornaments? We would love to see how you’d personalize them to your taste! Take a snap and tag us ( @cltregionrestore and @sadieseasongoods ) with the hashtag #ReStoreOrnaments !