DIY Felt Succulent Desktop Garden

Happy February, everyone! It’s Sarah of www.sadieseasongoods.com again, with a new upcycling project idea to share with you!
Who else (besides me) has tried to keep succulents alive but has absolutely zero luck? Well, the good news is that you can make felt succulents that will never, ever die on you! And your local Habitat Charlotte Region ReStore is full of potential “planters”, that are fun and quirky, as well. Perfect for creating your own soothing desktop garden, no matter how cold it is outside.
Here’s what you’ll need:
- Mini muffin tin, cake pan, pie tin or other “planter” from the ReStore
- Felt in a variety of Earth-tone colors
- Scissors
- Hot glue gun
- Aquarium gravel
Safety first!
Take extra care when using your scissors to cut out the succulent leaves. And remember that hot glue is, well, HOT! Make sure you don’t touch the glue when it’s still soft and keep your fingers away from the hot top of your glue gun.

Here’s how to Create a Felt Succulent Garden:
- Head to your local Charlotte Region ReStore and look for a “planter”. I chose a mini muffin tin because I loved the idea of plopping a felt succulent into each little cup.
- From your felt, cut out three sets of five “leaves”. Each set should be slightly smaller than the previous one. You can make them in any shape that you want- rounded, pointy, spiky, etc. Just make sure the five leaves in each set are the exact same size.
- With your hot glue gun, use a small amount of glue to attach the edges of one set of leaves together to form a half circle (or ⅔ circle).
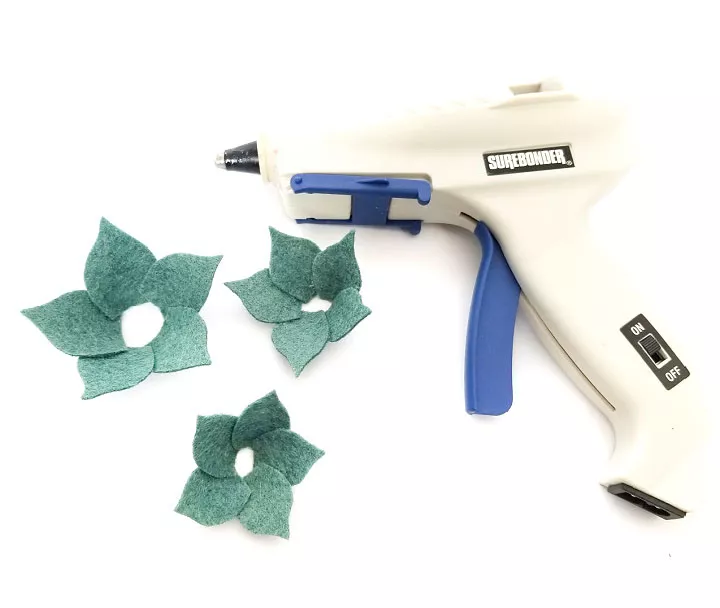
- Then, gently pull the open ends together to form a “cup” shape and glue those ends together. Do this with each of your three sets.
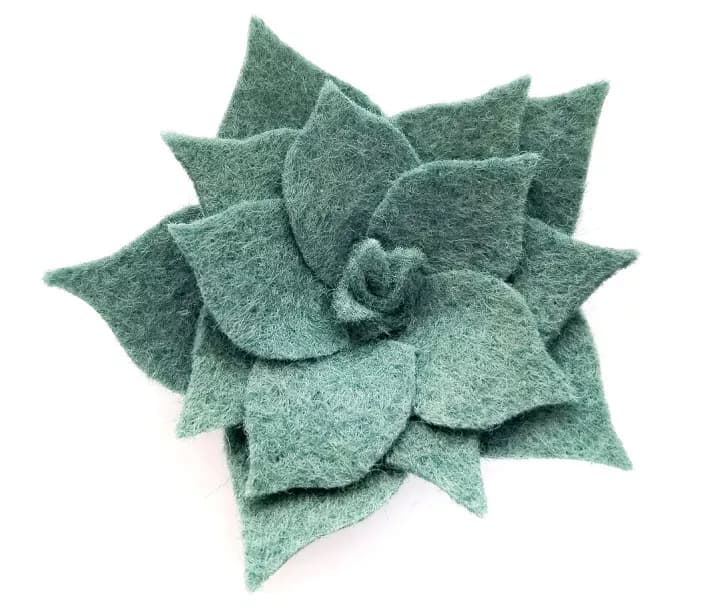
- Layer the three “cups” together, starting with the largest one on the outside. Glue each smaller cup inside the previous one.
- Make a small, rolled center from your felt and glue it in the opening in the middle. And just like that, you have a darling little felt succulent “plant”.
To make my desktop garden, I filled each cup of my mini muffin tin with aquarium gravel and set the succulents on top. But you could also use dried beans or other dainty vase filler material to do this. The best part? No watering needed!

Stay Warm & Crafty!
Are you loving this idea for zero-effort indoor gardening? We would love to see your felt succulents in a fun planter from the Charlotte Region ReStore! Take a snap and tag us ( @cltregionrestore and @sadieseasongoods ) with the hashtag #ReStoreSucculents!
P.S. Looking for more DIY ideas? Check out some of the fun projects we’ve completed like the DIY Football Stadium Snack Basket, perfect for Superbowl Sunday!